
Manage Gift Categories
For Administrators
If you have any further questions, please contact us at:
Overview
If a large range of gift items is offered, they can be arranged into categories to make it easier for purchasers to sort and select their choice from your web shop.
There are two ways of displaying categories:
- All gifts are displayed with a drop-down menu to sort on different voucher categories e.g. Monetary, dining, accommodation, spa.
This is suitable if you sell 10-12 gifts of different types.
- Gifts of the same type are displayed behind a category image. This is used if you sell many options of different types of gifts. E.g. you may wish to display gifts under: Monetary, Dining, Spa and Accommodation. Further subcategories are also possible. This option can also be used if you manage gift voucher sales for multiple venues from a single One Tree account. The gifts are displayed by venue.
Gifts can be displayed under more than one category. E.g. Spa day with afternoon tea, could be displayed under Spa and Dining. Add the required categories when creating a gift item.
A temporary category may be set up prior to Christmas, Mother’s Day etc and gifts particularly relevant to that event can be published in that category. This category must be unpublished manually after the gifting event has taken place. Similarly a ‘special offers’ category could be set up and a small range of gifts offered at a discounted price at particular times.
Create new category
With images
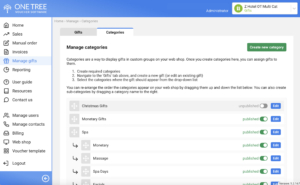
- Click Manage gifts
- Click Categories tab
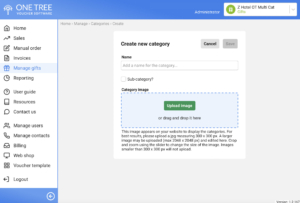
- Click Create new category
- Give the category a short name
- If this is a subcategory, check the box. (Select parent category. The subcategory displays as a link within the main category).
- Upload and crop and image using the handles. The image must be square and at least 300 x 300 px
- A sample of the category is displayed
- Click Save
- Add the gifts you wish to display in the category by editing an individual gift in Manage gifts and clicking on the relevant category in the dropdown box.
- Click the grey button to Publish the category. This turns to green.
- To unpublish the category, click the Publish/Unpublish button so that it is greyed out. The category is saved for future use but does not display on your website.
- Check the display on your online web shop.
Without images
- Click Manage gifts
- Click Categories tab
- Click Create new category
- Give the category a short name
- If this is a subcategory, check the box. (Select parent category. The subcategory displays as a link within the main category).
- Click Save
- Add the gifts you wish to display in the category by editing an individual gift in Manage gifts and clicking on the relevant category in the dropdown box.
- Click the grey button to Publish the category. This turns to green.
- To unpublish the category, click the Publish/Unpublish button so that it is greyed out. The category is saved for future use but does not display on your website.
- Check the display on your online web shop.
Edit a category
- Click Manage gifts
- Click Categories tab
- Click edit next to the category to be changed
- Amend name or image
- Click Save
Note: To change the gifts displayed under this Category:
- Click Manage gifts tab
- Filter by Category
- Click edit on gift to be removed
- Add and remove the allocated Categories by clicking X to remove or choose additional by selecting from the drop-down box.
- Click Save