
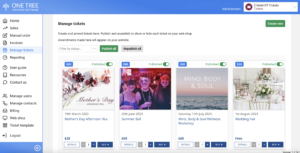
Manage Tickets
For Administrators
If you have any further questions, please contact us at:
Overview
This section allows you to create, edit, publish, unpublish or archive tickets for events held at your venue.
If you are selling more than 12 ticket types or want to offer different types of tickets for several events, we recommend organising the tickets in Categories. Your account must be set up to display categories. Please contact us if you would like to use categories.
The One Tree support team can assist in setting up a range of tickets, but this is simple to do yourself and you are also able to edit tickets if a similar event (with changes to times and dates) is offered in future. When tickets are marked as Published, they will appear on your web shop. If they are Unpublished, they do not appear, but they remain in the Portal. Unpublish tickets that you do not want to sell currently but may wish to use again in future. Unpublished tickets are not visible for manual sales.
Tickets can be Archived if they are no longer needed. Select Archive from the drop-down box to move a ticket to the Archive tab. The sales data relating to archived tickets will remain available in the system.
To re-use the formatting and text from an archived ticket:
- Click the Restore button.
- The ticket is moved back to the main workspace.
- Click Show all.
- Clone the ticket to prepare to make edits to the price or date etc.
- Click Edit on the previously archived ticket. Click Archive. This moves the previous ticket back to the archive.
- Edit the cloned ticket. By doing this a completely new ticket is created. If the previous ticket is simply edited and not cloned, you will add any new attendees and other data to the existing, which may make the guest list and sales information more complex to deal with.
The tickets are displayed on your web shop in the same order as they appear in the portal. To change the order, hover the cursor over the arrow in the bottom right-hand corner of the ticket type and drag it to its new position. This new order will be immediately displayed on your web shop.
The order the tickets are displayed on your website is important. You may want to add new tickets or group tickets for similar events close together.
Incomplete tickets cannot be published. E.g. an image must be added before publishing and all settings must be valid.
The price does not display on the ticket unless you add it within the copy.
It is recommended that you display the copy in sentences. The information describes what is included in simple terms and makes the ticket easy to use. This will prevent misunderstandings on either side.
Guest list
The sales page displays a list of individual tickets sold.
To view the total number of tickets sold for an event:
- Click on Manage tickets
- Click Edit on the relevant ticket
- The total number of tickets sold is displayed at the top of the page
- Click on Download guest list button to obtain a file of customer data
Create a new ticket
From the Manage tickets page:
Click Create new button.
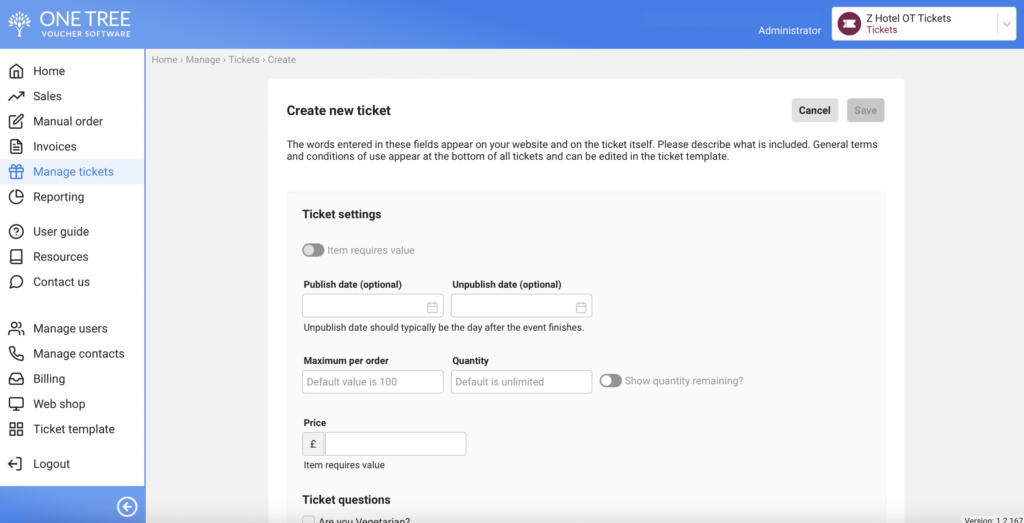
Ticket Settings
Publish and Unpublish dates can be added. Entering dates in these boxes (click on the calendar icon) automatically publishes and unpublishes the ticket from your online ticket shop. The ticket will be published or unpublished at 00.01 on the date entered. Therefore, if an event is taking place on 02/02/2022, and you wish to sell tickets throughout that day, enter 03/02/2022, to ensure that the ticket is available up to the time the event takes place. If these dates are left blank, the tickets can be manually published and unpublished at any time.
Maximum per order shows the number of tickets that can be bought in one transaction. The default is 100 and the number can be amended. Please note that if it is set to 1, a customer can only buy one ticket for an event in one transaction which is likely to reduce sales. The purchaser would need to start the buying process again to buy more tickets for that event.
Quantity is the total number of tickets you wish to sell for this event. If it is set to a low number and those sell out, a new amount can be added to this field. When all the tickets available for an event have been sold, the web display shows ‘Sold Out’. Note that the total amount of tickets made available should represent the maximum capacity for an event.
Sale price Enter the selling price including VAT. If multiple ticket options are available for the same event, click on Add multiple prices. Varying ticket prices can be added with a relevant descriptor, e.g. Adult and child. As the tickets are sold, the various ticket types are drawn down from the total number of tickets available.
Add questions To add questions to an event, click on the Add question box and choose a relevant format for the answer. Different questions can be applied to each ticket type.
1. Text – for short free-form text answers.
2. Textarea – for longer free-form text answers.
3. Checkbox – ticket purchasers must select one of several options. Use for menu choices or other fixed options. Select the number of options available and label each one.
4. Phone – use if you need a contact phone number for use during the event, e.g. for emergencies.
5. Radio – Similar to checkbox, but the display is small circle, rather than a box.
6. Number – for use where you need a numerical response. E.g. How many people are in your party?
7. Date – for use where you want dates to be entered in a fixed format.
On saving, the questions will appear during the purchase process and can be made optional or compulsory. The answers appear on the Guest list CSV file.
Questions can be deleted if they are no longer in use on any live event. The answers remain available.
Ticket design
Ticket name The name of the event.
Ticket image is the image that displays on the web shop. Add a suitable graphic or picture that represents the ticket. A graphic which ties in with your sales promotions could be used. Images can be cropped to the right size by dragging the handles in the image editor. For best results add a jpg measuring 256 x 192 px. Images that are smaller than this may not load.
Ticket header. A universal header can be added to the ticket template, in which case it will be used for all tickets. However, if you wish to tailor the header for a or specific event, a customised header can be added here. Upload the image from a pc. The header is a jpg measuring 1300 px by 326 px. Images can be cropped if required by dragging the handles in the image editor.
Ticket description
The date(s) can be added in any format desired. It is displayed on the ticket.
The description field allows you to enter details of your venue and information on what is included. This is a free-form text box, and the following might be included:
- Start and finish times
- Brief description of a performer or display
- Outline of food or drink/paid bar facilities
- Availability of vegetarian options
- Dress code
On saving, please check the ticket for spelling or grammatical errors.
Cloning a ticket
If you want to offer an existing ticket as part of a new event, the current ticket can be cloned and then dates, or other details amended. This ensures that it appears as a new item within reporting.
- Click the Edit button on the ticket to be cloned.
- Click the clone button.
- Amend the text, dates, image and header as required.
- Click Save.
- Preview the text on the ticket and check for errors.
- Click Back.
- The new ticket will be displayed at the bottom of the list.
- Drag the ticket to a relevant position in the display.
- Important: Click the Unpublish/publish button. The ticket will not be displayed in the web shop unless it is published.
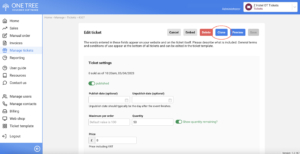
Edit a ticket
Click the Edit button on the ticket concerned and amend any details required. E.g. To add more places. Click Save. Tickets can be published or unpublished on the web shop by clicking on the green buttons.